VICTORIA, BC. June 9, 2026 — CRN has announced Premier Cloud in 486th place on the 2026 CRN Solution Provider 500 list.
CRN’s annual Solution Provider 500 list ranks the top revenue-generating IT services firms in North America. This prestigious index highlights the major technology channel players driving global industry expansion and innovation.
“The Solution Provider 500 list highlights those companies generating the highest revenue through leadership in business and service innovation,” said Jennifer Follett, Vice President, U.S. Content, Executive Editor at CRN, The Channel Company. “This recognition highlights those organizations that consistently demonstrate agility and sustained growth amid rapidly evolving industry demands and technological change. Congratulations to every company that earned a well-deserved place on this year’s Solution Provider 500.”
As IT environments become more sophisticated and technologies such as AI continue to reshape how businesses operate, customers need trusted partners who bring both strategic guidance and hands-on technical expertise. Premier Cloud remains focused on helping organizations navigate this complexity with secure, scalable, and innovative cloud and AI solutions.
Looking ahead, we remain focused on building innovative solutions on Google Cloud, fostering strategic partnerships, and delivering the high-impact results that define our clients’ success.
Premier Cloud is proud to share that we have been named to CRN’s 2026 Tech Elite 250, an annual list recognizing solution providers across the U.S. and Canada that distinguish themselves through advanced technical certifications, specializations, and expertise from leading technology vendors.
The Tech Elite 250 highlights companies that demonstrate a strong commitment to excellence in areas such as artificial intelligence, infrastructure, cloud, and security. For Premier Cloud, this recognition reflects our continued investment in the skills, partnerships, and technical capabilities required to help organizations modernize, scale, and solve complex business challenges with confidence.
As IT environments become more sophisticated and technologies such as AI continue to reshape how businesses operate, customers need trusted partners who bring both strategic guidance and hands-on technical expertise. Premier Cloud remains focused on helping organizations navigate this complexity with secure, scalable, and innovative cloud solutions.
Being included on CRN’s Tech Elite 250 is a meaningful acknowledgment of the work our team does every day to deliver high-impact outcomes for customers. It also reinforces our commitment to maintaining the certifications, training, and vendor specializations that enable us to provide expert support across today’s evolving technology landscape.
The world of artificial intelligence is moving fast. Not long ago, we were impressed by AI that could answer questions. Now, we’re on the cusp of a new era where AI can do things for us. This is the shift from AI as an information tool to AI as a teammate. And at the forefront of this transformation is the new Gemini Enterprise.
If you’re wondering what this means for your business, you’ve come to the right place. In this post, we’ll break down what’s new in Gemini Enterprise and, more importantly, why you should care.
One Platform, Two Powerhouses: Agent Platform and the Gemini App
At its core, the new Gemini Enterprise is an end-to-end system designed for this new “agentic” era of AI. It’s composed of two main parts:
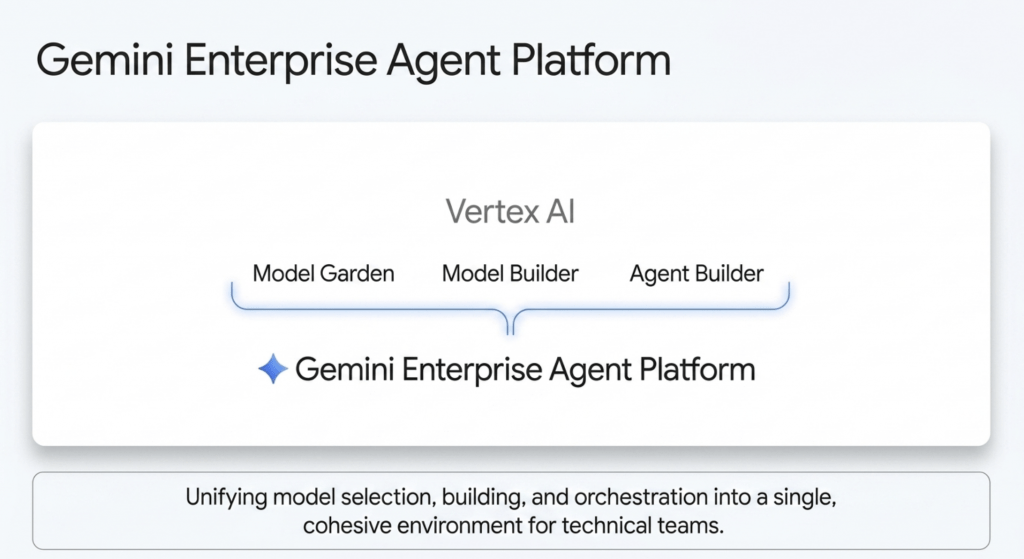
Gemini Enterprise Agent Platform: Think of this as the engine room. It’s the evolution of Vertex AI, providing a comprehensive environment for developers to build, scale, govern, and optimize AI agents.
Gemini Enterprise app: This is the bridge between the powerful AI agents and your team. It’s a single, secure place where employees can discover, create, and use AI agents to get work done.
Together, these two components create a unified system that allows your business to harness the power of AI agents in a secure and scalable way.
Build, Scale, and Govern: A New Era of AI Development
One of the biggest challenges with AI has been moving from exciting demos to real-world business applications that are secure and reliable. Gemini Enterprise addresses this head-on with a suite of new capabilities:
For the Builders: Tools for Every Skill Level
Whether you have a team of expert AI developers or want to empower your business users to create their own solutions, Gemini Enterprise has you covered.
Agent Development Kit (ADK): For your technical teams, the enhanced ADK provides a powerful, code-first environment to build sophisticated, multi-agent systems.
Agent Studio: For those who prefer a more visual approach, Agent Studio offers a low-code interface to build and deploy agents quickly.
This flexibility means you can get from idea to production in hours, not months, and unlock the creativity of your entire team.
For the Strategists: Scaling with Confidence
Building an agent is one thing; deploying and managing a fleet of them is another. Gemini Enterprise provides the infrastructure to do just that.
Agent Runtime: This allows for long-running agents that can work autonomously for days on complex, multi-step tasks.
Memory Bank: This gives agents long-term memory, allowing them to remember user preferences and past interactions for more personalized and effective assistance.
These features enable you to move beyond simple, one-off tasks and start automating entire business processes, like sales prospecting or financial reconciliation.
For the Guardians: Security and Governance by Design
As AI becomes more integrated into your business, security and governance become paramount. Gemini Enterprise is built with this in mind, offering a range of features to give you peace of mind.
Agent Identity: Every agent is assigned a unique, verifiable identity, creating a clear audit trail for every action.
Agent Registry: This provides a central library of approved agents and tools, so you know your team is using trusted, vetted resources.
Agent Gateway: This acts as a central control point, enforcing security policies and preventing data leakage.
With these features, you can embrace the power of AI without sacrificing control or security.
The Bottom Line: What This Means for Your Business
So, what does all this new technology mean for your bottom line? Here are a few of the business outcomes you can expect:
Increased Productivity: By automating complex, multi-step processes, you can free up your team to focus on more strategic, high-value work.
Faster Innovation: With tools that make it easier to build and deploy AI solutions, you can bring new products and services to market faster.
Improved Decision-Making: By giving your team access to AI-powered insights, you can make faster, more data-driven decisions.
Enhanced Customer Experience: By using AI agents to provide more personalized and efficient service, you can improve customer satisfaction and loyalty.
The new Gemini Enterprise is more than just a new set of tools; it’s a new way of working. It’s about empowering your entire organization to leverage the power of AI to drive real business results. The age of the AI agent is here, and with Gemini Enterprise, your business can be ready for it.
Welcome to the Agentic Era. For organizations already deeply invested in Google Cloud Platform and Google Workspace, the experimental phase of artificial intelligence is firmly in the rearview mirror. At Google Cloud Next 2026 in Las Vegas, the narrative officially shifted from isolated generative AI chatbots to fully integrated, semi-autonomous “agentic systems” capable of running entire workflows.
For technology leaders whose primary concerns are establishing ironclad security, optimizing cloud costs (FinOps), and streamlining complex cloud migrations, Next ’26 delivered a cohesive, highly actionable blueprint. Google is no longer just offering tools; it is providing the end-to-end connective tissue needed to deploy a digital taskforce securely and at scale. Here is a comprehensive deep dive into the most critical announcements across Gemini Enterprise, Google Workspace, and Google Cloud Security.
Gemini Enterprise: The Engine for Agentic Operations
Google is unifying its AI portfolio to help enterprises transition from simply answering prompts to delegating full business outcomes. Gemini Enterprise provides a single environment for teams to build, scale, govern, and optimize their AI agents.
Gemini Enterprise Agent Platform: Representing the evolution of Vertex AI, the Gemini Enterprise Agent Platform is the comprehensive foundation for technical teams. It combines the model selection and building capabilities that developers already rely on with powerful new features for orchestration, security, and DevOps. To directly address the growing need for strict FinOps and cost optimization, Google also introduced proactive cost anomalies detection. A new, dedicated FinOps agent autonomously analyzes spending spikes across your environment and generates highly granular cost reports on demand, ensuring your AI scaling doesn’t lead to unexpected budget overruns.
Gemini Enterprise App: For the everyday workforce, the Gemini Enterprise App serves as the new collaborative “front door” to AI. It is designed to empower non-technical employees to build and manage their own digital assistants.
Agent Designer: This no-code visual builder allows business users to create sophisticated, multi-system workflows using simple natural language. Employees can now build agents that trigger automatically based on specific events or run on a set schedule without writing a single line of code.
Inbox in Gemini Enterprise: As employees deploy more long-running agents to handle tasks like financial reconciliation or sales sequencing, they need a way to track them. The new Inbox acts as a unified hub to monitor active workflows, adjust configurations, and receive real-time status alerts, ensuring automated processes always stay on track.
Projects: To solve the problem of context loss, Projects creates a persistent, data-grounded knowledge base for your team. It serves as a secure “shared brain” that grounds the AI strictly in explicitly added files and conversations. This ensures that critical project intelligence remains a permanent company asset, providing true operational continuity even as team members change roles.
Gemini Enterprise for Customer Experience (CX) Designed to seamlessly unify the shopping and service journey, this suite ensures a frictionless customer experience from product discovery to post-sale support.
CX Agent Studio: A low-code visual builder that allows teams to design empathetic, highly multimodal agents grounded entirely in your enterprise data.
Omnichannel Gateway: This guarantees that a customer’s context travels flawlessly across web, mobile, voice, and social channels without any lag or repetition. The return on investment here is already proven; for example, Best Buy utilized these tools to increase their customer self-service rates by a staggering 200% by having agents engage in precise, long-format troubleshooting.
Google Workspace: Reimagining Enterprise Productivity
For the billions of users relying on Google Workspace, AI is transforming the suite from a collection of static applications into a dynamic, interconnected ecosystem.
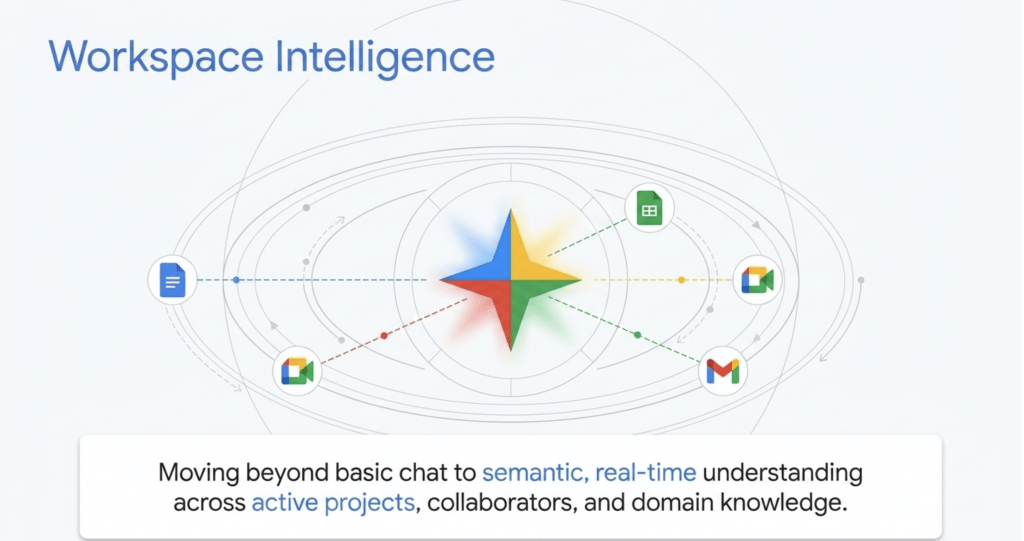
Workspace Intelligence: The cornerstone of this transformation is Workspace Intelligence, a new, unified semantic layer. Instead of forcing users to manually copy and paste context into every single prompt, Workspace Intelligence inherently understands the complex relationships within your specific work ecosystem. It securely maps your active projects, your frequent collaborators, and the domain knowledge living across Docs, Slides, and Gmail. This allows the AI to do the heavy lifting of gathering context across silos, safely providing personalized, highly relevant outputs.
New AI Features in Google Workspace
Ask Gemini in Google Chat: Your Chat window is now a unified command line for all of your work. It provides a daily briefing that surfaces important tasks and unread threads. Crucially, with expanded third-party connectors (like Asana, Jira, and Salesforce), Ask Gemini bridges the gap between your Workspace content and external tools, allowing you to find information across your entire tech stack without leaving the conversation.
Docs: Gemini can now automatically generate infographics, edit multiple images simultaneously, and automatically triage or edit documents based on user comments.
Slides: You can now generate full, editable presentation decks in one shot, with the AI strictly adhering to your company’s official templates and styles.
Sheets: A new Interactive Canvas allows you to use natural language to build interactive mini-apps—like kanban boards and custom dashboards—directly on top of your live data.
Drive: Drive Insights and Projects centrally organize files to give Gemini full context, allowing you to instantly extract insights across your entire drive using AI Overviews.
Vids: You can now quickly convert presentations into videos featuring highly realistic, fully branded AI avatars, complete with custom company logos and backdrops.
Workspace MCP Server: Currently in public preview, the Workspace Model Context Protocol (MCP) Server allows developers to safely bring advanced Workspace capabilities—like synthesizing Drive documents or drafting Gmail responses—directly into their own custom AI applications and agents using a secure, open framework.
Rapid Enterprise Migration: For organizations looking to move away from legacy tools, migrating your entire organization from Microsoft 365 to Google Workspace is now up to five times faster. This is powered by a new cloud-based data import service built directly into the admin console. To ensure there is no friction when collaborating with external partners still using Office, Google has also added improved interoperability features like an AI-powered Office macro converter, native Office file editing in Gmail, and redlining in Docs.
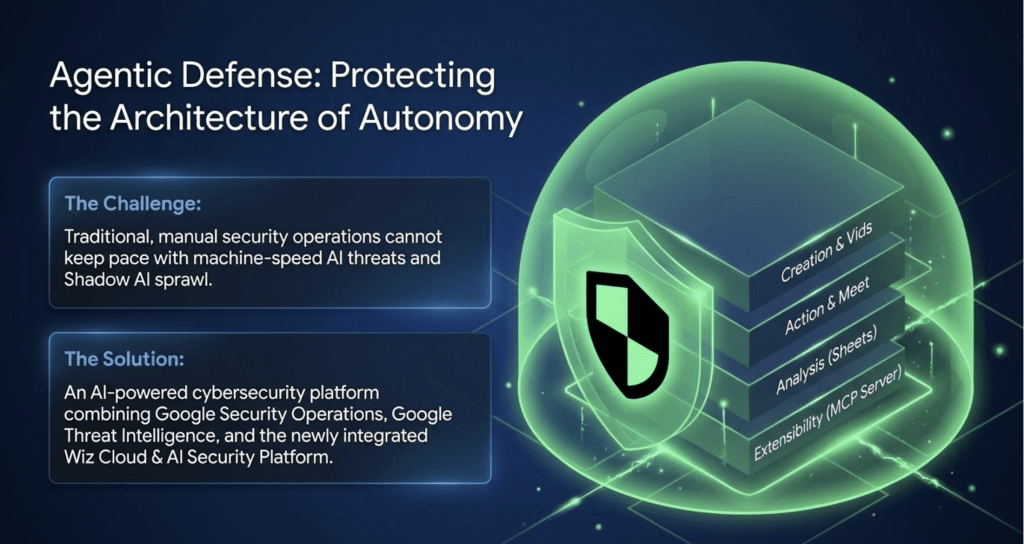
Agentic Defense: Securing the Autonomous Frontier
As AI accelerates business operations, it simultaneously accelerates the speed of malicious actors. At Next ’26, Google revealed that adversaries have reduced the time it takes to move from initial access to a threat hand-off from eight hours down to a terrifying 22 seconds. To combat this, human defenders require AI that operates at machine speed.
Wiz AI-Application Protection Following its deep integration into the Google Cloud ecosystem, Wiz introduced a comprehensive suite to secure the entire AI development lifecycle. A standout capability is the AI-Bill of Materials (AI-BOM). This dynamic tool automatically inventories all AI frameworks, language models, and IDE extensions across your multicloud environment. It provides absolute visibility into what is writing code in your stack, tracking sanctioned tools while aggressively uncovering and flagging unapproved “shadow AI” plugins. Furthermore, Wiz now offers inline security scanning that natively protects vibe-coded applications, surfacing vulnerabilities before they ever reach production.
Securing Agents and the Agentic Web: To ensure that autonomous agents operate within strict, governed boundaries, Google introduced several foundational security layers. Agent Identity provides every digital worker with a unique cryptographic identity, allowing for precise, scoped human delegation and access management. Agent Gateway acts as a centralized air-traffic controller, enforcing strict security policies across all agent-to-agent and agent-to-tool communications. Finally, Model Armor integrates directly with Agent Gateway to provide robust runtime protection against emerging threats like prompt injections and sensitive data leakage.
Agentic Threat Intelligence: To shift security from reactive to proactive, Google Security Operations introduced three new specialized, autonomous defenders.
Google Cloud Fraud Defense: As commerce becomes increasingly automated, identifying who—or what—is interacting with your systems is paramount. In a major evolution of reCAPTCHA, Google launched Fraud Defense. This unified trust platform is explicitly engineered for the agentic web, capable of discerning the subtle differences between human users, malicious botnets, and authorized, helpful AI agents, effectively securing the digital journey from registration through to final payment.
The Agentic Data Cloud: Fueling Autonomous Action
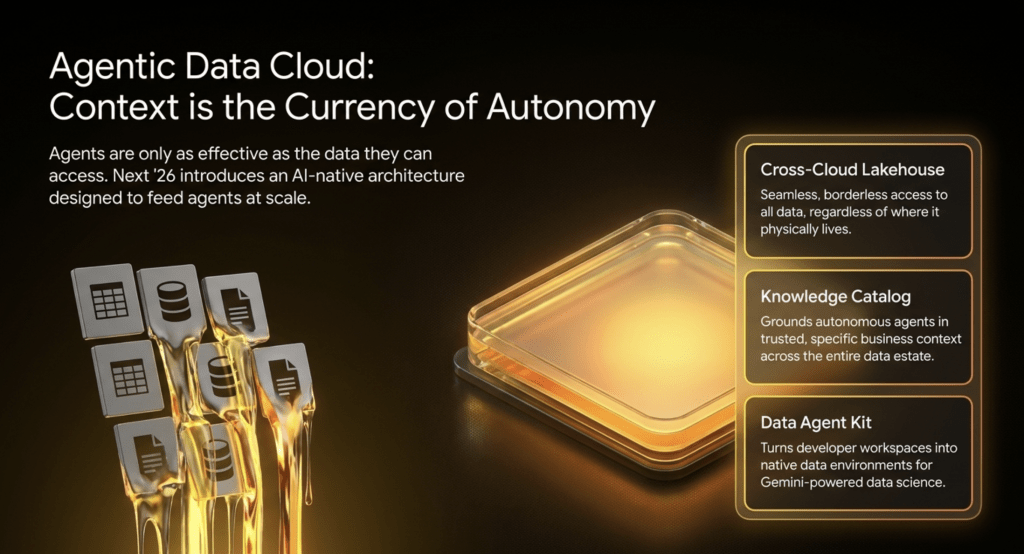
In the agentic era, an AI agent is only as smart as the data it understands. Google’s Agentic Data Cloud unifies your operational databases, analytical lakehouses, and AI models so your digital taskforce is grounded in absolute enterprise truth—without causing cloud costs to spiral.
Here are the core upgrades:
Knowledge Catalog (Governance): This replaces static data dictionaries with a dynamic, universal context engine. It autonomously maps your business logic and permissions without moving a single byte of data, ensuring agents execute tasks accurately based on your company’s unique lingo.
Cross-Cloud Lakehouse (Migration): Standardized on open Apache Iceberg, this allows you to instantly query data across Google Cloud, AWS, and Azure. It provides zero-copy, zero-ETL access, completely eliminating the latency and massive egress fees normally associated with cross-cloud data.
BigQuery Fluid Scaling (FinOps): Built for unpredictable agentic workloads, BigQuery now adapts dynamically with true per-second billing and zero minimums. This structural change delivers up to 34% in immediate cost savings for enterprise FinOps teams.
The Data Agent Kit: This shifts data engineering teams away from writing manual pipelines and toward agent orchestration. It turns any developer workspace into a native data environment to autonomously generate production-ready code.
Conversational BI with Looker: Looker introduces Dashboard Agents that allow everyday users to ask natural language questions directly within their dashboards, delivering answers that are strictly governed by your enterprise semantic layer.
AlloyDB AI at Massive Scale: To support the performance demands of enterprise AI, AlloyDB AI now scales to support over 10 billion vectors. It can process 100,000 rows per second for less than a tenth of a cent, bringing unprecedented cost-efficiency to operational databases.
Conclusion
Google Cloud Next 2026 proved that the infrastructure, intelligence, and security layers required for enterprise-grade AI are now fully integrated. By combining the unified context of Workspace Intelligence, the orchestration power of the Gemini Enterprise Agent Platform, and the machine-speed protection of Agentic Defense, Google Cloud has provided mature organizations with the exact tools they need to safely modernize their legacy systems, optimize their FinOps, and unleash the true ROI of artificial intelligence.
Google Cloud Marketplace is more than a storefront. It is a procurement channel that helps buyers discover, evaluate, and purchase software with predictable billing and enterprise-grade procurement mechanics. For sellers, it can shorten buying cycles, increase deal size, and unlock co-selling opportunities inside the Google Cloud ecosystem.
What makes Marketplace high value
Marketplace simplifies procurement for enterprise buyers by connecting solutions to existing Google Cloud contracts and billing. That makes purchases easier and payments more predictable. Independent research shows that Marketplace often leads to longer, larger agreements for ISVs and partners while reducing procurement friction.
The practical pieces every listing must get right
A successful listing is a mix of technical, commercial, and operational readiness. Key requirements include validated architecture and security, a defined pricing and packaging model, seamless ordering and billing workflows, and end-to-end testing to meet Google standards. Failing any of these areas causes delays or rework during Google reviews.
A concise Marketplace launch checklist
Business readiness. Enroll in the Partner Advantage program, sign vendor agreements, and configure the payment profile and linked billing account.
Technical integration. Enable Marketplace APIs, publish an architecture diagram, deploy a registration page and an order processing application, and implement usage reporting when needed.
Pricing and packaging. Decide between subscriptions, usage-based models, or private offers, and document the billing flow.
Test and validate. Perform test purchases and end-to-end acceptance tests with Google to confirm fulfillment and billing behave as expected.
Launch and enablement. Publish the listing, support initial transactions, and coordinate go-to-market and co-selling motions.
How to reduce time to revenue
Because Marketplace is both technical and commercial, many teams benefit from a repeatable integration play. Native Marketplace workflows remove ongoing fulfillment overhead. Structured programs that combine architecture validation, order processing, testing, and GTM alignment make launches predictable and faster. Premier Cloud documents a multi-phase lifecycle that covers readiness, validation, integration, testing, and launch while providing hands-on engineering support for APIs, order processing, and test purchases.
Premier Cloud also offers packaged professional services to accelerate onboarding and preserve engineering capacity. This makes it easier for product teams to focus on product while Marketplace specialists handle the integration and approval process.
Bottom line
Google Cloud Marketplace can be a high impact GTM channel when technical, commercial, and operational steps are coordinated. Use a clear checklist and consider a partner that knows the Marketplace lifecycle to reduce rework and get to transactions faster. If you want a practical plan to list your solution and manage fulfillment, Premier Cloud can help you move through readiness, integration, and launch.
AI is everywhere right now, but most leaders are no longer asking whether it can write a paragraph. They are asking whether AI can safely support real work, connect to business systems, respect permissions, and meet compliance requirements.
Gemini Enterprise is Google Cloud’s agentic AI platform built for that exact reality. Below are the five questions businesses keep asking, along with clear, practical answers.
1) What is Gemini Enterprise?
Gemini Enterprise is a secure, enterprise-focused AI platform designed to help employees search, analyze, synthesize, and automate workflows using Google’s Gemini models and agent technology. In October 2025, Google Agentspace became part of Gemini Enterprise, meaning the conversational AI and agent orchestration capabilities behind Agentspace now power core Gemini Enterprise functionality.
Rather than existing as a standalone chat tool, Gemini Enterprise is positioned as an agentic layer across the business. Employees can investigate topics, summarize internal knowledge, and coordinate complex tasks using AI agents designed for enterprise workflows.
2) How is Gemini Enterprise different from the Gemini app?
This is one of the most common points of confusion.
The Gemini app is built for general public use. Gemini Enterprise is built specifically for business and enterprise environments. It is designed to address challenges such as fragmented organizational data, cross-functional collaboration, and stricter security, privacy, and compliance requirements.
In practice, Gemini Enterprise is meant to be the work version of Gemini. It connects to company systems and operates under enterprise governance rather than functioning as a consumer chatbot used at work.
3) Who owns the data, and is any of it used to train models?
For many organizations, this is the deciding question.
With Gemini Enterprise Business, Standard, and Plus editions, customers retain full ownership of their data. Prompts, responses, and training data are not used to train Google models or models for other customers. Google does not sell customer data or use it for advertising.
There is one important distinction. The Starter edition, which is an optional no-cost experience following the Gemini Business trial, may use data for product improvements and to train Google machine learning technologies. Customers can opt out of this behavior at any time through settings.
4) What security and compliance controls does Gemini Enterprise support?
Gemini Enterprise is designed for organizations that require governance and control.
The platform supports enterprise-grade capabilities such as identity and access management, document-level permissions, audit logging, and customer-managed encryption keys. Certain editions also support data residency, allowing organizations to keep data within specific geographic regions. Gemini Enterprise aligns with major compliance standards such as HIPAA and FedRAMP.
In addition, Gemini Enterprise includes built-in guardrails that screen AI prompts and responses for unsafe or malicious activity, including prompt injection and sensitive data exposure.
5) What can employees actually do with Gemini Enterprise?
Gemini Enterprise focuses on delivering value through both pre-built agents and customization.
Out of the box, it includes Google-built agents designed for tasks like deep research, secure information synthesis, and AI-assisted software development. These agents help teams move faster without requiring custom setup.
For organizations with more advanced needs, Gemini Enterprise allows teams to build and deploy their own agents or integrate existing ones. The platform also connects to common enterprise tools, including Google Workspace, Microsoft applications, and platforms such as Jira, Confluence, and ServiceNow. These connectors allow AI to work with business data while still enforcing existing access controls.
The bottom line
Gemini Enterprise is designed for organizations that want AI to move beyond experimentation and into everyday execution. By combining advanced AI reasoning with enterprise connectivity, strong security controls, and flexible agent capabilities, it provides a foundation for using AI responsibly inside real business workflows.
Google Workspace continues to roll out features that make everyday work a little easier. Here are three recent updates that offer practical improvements for communication, compliance, and file organization.
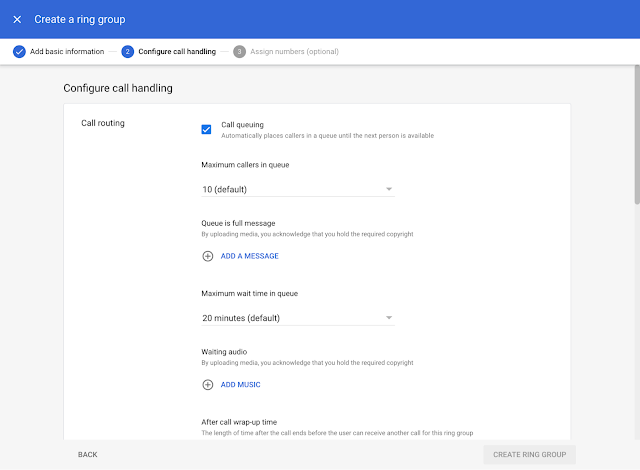
1. Call Queuing for Google Voice
Google Voice now supports call queuing for ring groups in the Standard and Premier editions. Incoming callers are placed in a queue instead of being sent to voicemail or disconnected. This helps teams handle high call volumes and reduce missed opportunities. Admins can set options like maximum wait time, queue size, and wrap-up time, making it easier for support and sales teams to stay responsive.
2. Automated Compliance Recording for Google Meet
Organizations in regulated industries can now use automated compliance recording in Google Meet. When a regulated user joins a meeting, the call is recorded and a transcript is saved automatically. Recording data is stored in a secure write-once, read-many Cloud Storage bucket to meet regulatory requirements in industries such as finance and healthcare. Participants will see a Compliance badge when this feature is active. This provides seamless compliance without disrupting the meeting experience.
3. Smart Folder Insights in Gemini for Google Drive
Gemini in Google Drive now shows instant folder insights right at the top of a folder. You can see a quick summary of what is inside, including document types, key themes, and recent updates. You can also select Explore with Gemini to get a deeper summary or ask questions about the folder contents. This helps users save time and stay organized, especially when working with large collections of files across multiple projects.
Why These Updates Matter
Improved responsiveness with smarter call handling
Stronger compliance support for regulated industries
Faster information discovery with AI powered folder insights
These updates help teams work more efficiently, stay compliant, and find information faster. If your organization needs in enabling and making the most of these features in your organization, contact us here.
We’re excited to announce that Lee Henwood, Premier Cloud’s Senior Sales Manager, has been recognized in CRN’s 2025 Next-Gen Solution Provider Profiles. This annual program highlights rising leaders across the IT channel who are already driving significant impact, and Lee’s work within our organization has been a major contributor to Premier Cloud’s continued growth.
Strengthening Our Sales Organization
In Lee’s role as Senior Sales Manager, they support Premier Cloud’s sales teams by providing strategic guidance, coaching, and day-to-day leadership that elevates performance across the board. Lee has been instrumental in refining our sales processes, improving operational efficiency, and ensuring our teams stay aligned with evolving customer needs in a rapidly shifting technology landscape.
Lee’s leadership has helped our teams better articulate the value of emerging cloud and AI solutions, strengthening our ability to deliver modern, scalable technologies to organizations of all sizes.
Driving Momentum in Cloud & AI Solutions
A major area of Premier Cloud’s growth has come from supporting customers adopting Gemini Enterprise, Google’s advanced generative AI suite. Lee has played a key role in preparing our sales team to guide clients through these capabilities, helping them understand how Gemini Enterprise enhances productivity, supports decision-making, and integrates seamlessly into existing workflows.
In addition, Lee continues to champion expanded use of Google Workspace and broader cloud solutions, ensuring our customers receive expert guidance on tools that improve collaboration, streamline operations, and harness AI-driven features.
A Well-Earned Recognition
Lee’s inclusion in CRN’s 2025 Next-Gen Solution Provider Profiles is a testament to his leadership, dedication, and forward-looking mindset that help drive our success. Join us in celebrating this achievement as we continue empowering our clients and shaping the future of cloud innovation.